Selection lists
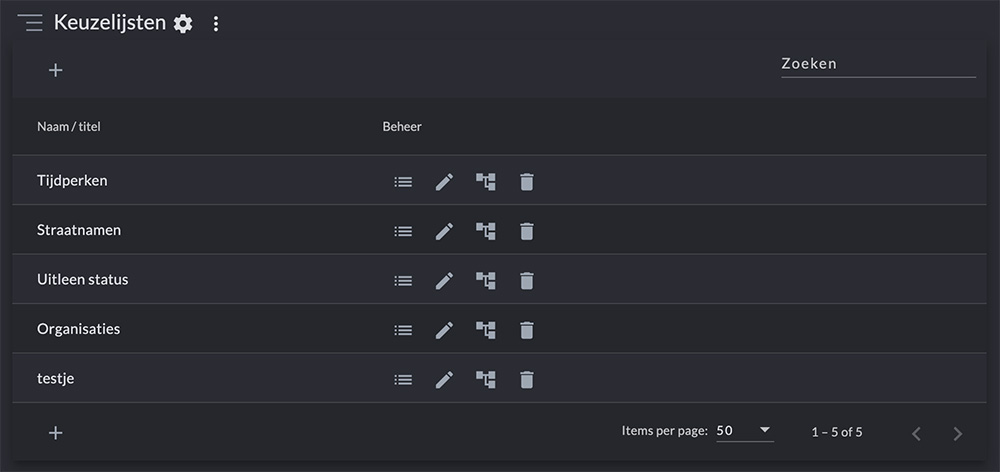
DocsGo to the 'Selection lists' page in the menu on the left. Click on the + button to create a new dropdown. Enter a name for the selection list. You can set the read and write rights per role (Administrator, editor, employee or analyst) and determine who you want to give access to the selection list. Then click on "next".
You can link a term to the name of your dropdown list. Click on the + button to have the system search for a term in the thesauruses of the Term Network. Select the term that best fits the name of your dropdown list.
Next, determine which columns you want to see in the overview of the relevant picklist. Click on "add column" to select an object field that you want to see in the overview. Columns that you set here will be shown by default to all users who will view and/or manage the records of your picklist.
Finally, you can provide each record of your selection list with underlying information. In principle, you can manage each record in a selection list in the same way as you can manage an object with its own input fields. On the right side are all available subjects, on the left side are the subjects that belong to the 'current structure'. To add a subject to the current structure on the left side, you must first click on the toggle button 'Edit' at the top right. After this, you can use the arrows to move a subject from right to left. You can also drag it from right to left (drag and drop) and release. This way you can determine the order of the subjects.
Set up and manage picklist records as objects
Click on 'edit structure' behind the name of a drop-down list. Here you set subjects/categories (with associated fields). On the right side are all available subjects, on the left side are the subjects that belong to the 'current structure'. To add a subject to the current structure on the left side, you must first click on the toggle button 'Edit' at the top right. After this you can use the arrows to move a subject from right to left. You can also drag it from right to left (drag and drop) and release. This way you can determine the order of the subjects.
If you want to create a new topic, click on the gear next to the title 'Selection lists'. You will get an overview of the existing topics. Click on the + button to create a new topic. You can optionally set the read and write permissions of a topic. 
What are picklists useful for?
List boxes are used to allow users to select a value instead of manually entering it. This can prevent typing errors and makes it possible to link additional information to values (terms).
An example
You can create a selection list of organizations that you borrow from and/or lend to. Users only need to select the name of the organization. Linked to the organization are, for example, the address details, the contact person, telephone numbers and/or e-mail addresses. Or do you use a lot of Latin names? Then selection lists are useful because you are certain that other users cannot make spelling mistakes.
Link selection list
You can set up picklists that you have created yourself as a field for an object for your users. You do this by adding a new field to a subject (e.g. to Identification or Valuation). Enter a name for the field and select the field type "Picklist". A list will now appear with all the picklists that you can select. Select the desired picklist. If necessary, select 'Advanced picklist' if you have created a very large picklist. With this advanced picklist, users can search extensively in the picklist.
Delete dropdown lists and/or records
To remove a dropdown list, do the following:
- Go to 'Dropboxes' in the left side menu
- Click on the three dots behind the name of the drop-down list you want to delete
- Click on 'Delete'
- Enter the name of the dropdown list to confirm
- The dropdown list has now been removed
To remove a record from a picklist, do the following:
- Go to 'Dropboxes' in the left side menu
- Click edit behind the name of the picklist from which you want to delete a record
- Click on the three dots behind the name of the record you want to delete
- Click on 'Delete'
- Enter the name of the record to confirm
- The record has now been deleted
Please note: The data of objects that used these selection lists or records will be permanently deleted and cannot be retrieved. On request, we can retrieve this data for you. There are costs involved.

Advanced dropdown lists
By default, users are offered a simple dropdown with search function to make a selection from your selection lists. However, for selection lists with a very large number of records, you can set an advanced selection list. When the user opens this selection list, the user has the option to search and filter extensively within the selection list, as is the case for the advanced search for descriptions or objects.
Optionally, you can select additional settings for the field in question, such as "Do not change type" or "Do not duplicate".
- © Copyright KLEKSI - KLEKSI is a product of Sofco
- Privacy policy
- Cookies
- Developed by Sofco
