

Create and manage dashboards
DocsWith KLEKSI, you can easily create multiple dashboards and customize them completely to your liking. Using widgets, you decide which information, functions, and statistics are displayed on a dashboard. This allows you to create a clear and organized work environment that aligns with your work.
KLEKSI offers a standard KLEKSI dashboard where updates are listed so that you stay informed about the further development of KLEKSI. Additionally, you can create your own dashboards and add them to the dashboard menu using the pin function.
Create a dashboard
You can create multiple dashboards, for example for specific tasks, collections, or user groups.
Add new dashboard
- Go to Dashboards in the menu on the left.
- Click the + button to create a new dashboard, or click duplicate if you want to use an existing dashboard as a basis for a new dashboard.
- Enter a name for the dashboard.
- Click Save.
- Next, add the desired widgets to assemble the dashboard.
- After creation, you can further configure and customize the dashboard.
Setting up a dashboard with widgets
A dashboard consists of separate components called widgets. Each widget has its own function and can display information, statistics, or tools.
You decide which widgets to use, where they are placed, and how much space they occupy.
Add widgets
- Open the dashboard you want to customize.
- Activate the dashboard edit mode.
- Click the button to add a widget.
- Select the desired widget from the overview.
- Configure the widget as desired.
- Save the changes.
The widget is then added to the dashboard.
Adjust and move widgets
You can adjust the layout of a dashboard at any time.
- Move – Change the position of a widget on the dashboard.
- Resize – Increase or decrease the width and height of a widget.
- Change settings – Customize which information the widget displays.
- Remove – Remove a widget that you no longer need.
- Depending on the type of widget, you can specify additional settings, such as a specific list, folder, collection, filter, or view.
The same widget can be used multiple times on a dashboard, optionally with different settings.
Available widgets
KLEKSI offers various widgets that allow you to build dashboards. The widgets are divided into categories.
- List – Displays the objects from a user-selected list.
- Folder – Displays the most recent files from a selected folder in the file manager.
- Objects – Displays a table with objects where you define the filters, columns, and sorting yourself.
- Linked data – Displays the results of a SPARQL query as a chart or table. You construct the query in the SPARQL Explorer.
- Collections – Displays the collections within the application, so you can quickly open, edit, or add to them.
Activity
With these widgets, you stay informed of recent changes, notifications, and ongoing processes.
- Notifications – Displays notifications, such as export jobs that are still being processed and failed uploads.
- Last modified – Shows the items that were last modified.
- Open comments – Shows comments from visitors that still need to be addressed.
- Bulk actions – Provides insight into ongoing and recently failed bulk actions.
Statistics
These widgets provide insight into the size, development, and usage of your application and collections.
- Count – Displays a single statistic, such as the total number of objects, the number of new objects this month, or the number of publicly visible objects.
- License Usage – Shows the usage of a specific part of your license, such as storage space or the number of records.
- Growth – Show how the number of objects has developed over the past twelve months.
- Distribution – Shows the distribution of objects, for example by object type or publication status.
- Data traffic – Provides insight into the number of requests and data traffic per day or month.
- Storage and files – Shows the used storage space and the number of files.
- Publication – Show whether the collection is published as Linked Open Data and which PID prefix is used for this.
- Users per role – Shows the distribution of users across the different roles within the application.
Aids
These widgets provide quick access to frequently used functions and additional tools.
Application Toggle – Displays the current application and offers the option to quickly switch to another application.
- Hoot – Ask Hoot, the AI assistant, questions about KLEKSI.
- Debug – Displays technical information about the current session. This widget is intended for super administrators.
- Shortcuts – Provides shortcuts to add a new object, a list, or a file, for example.
Layout
With these widgets, you can organize dashboards clearly and provide them with additional information.
- Welcome message – Displays a welcome message with the name of the application and the license type.
- Text – Add a title, subtitle, or description to organize the dashboard clearly or to explain sections.
- Divider line – Places a divider line between different parts of the dashboard.
KLEKSI information
In addition to the widgets above, there are widgets available that keep you informed of new developments within KLEKSI.
- Updates – Displays information about recent updates, improvements, and new features.
- Roadmap – Provides insight into the planned developments and future functionalities of KLEKSI.
Pinning a dashboard to the menu
You can decide which dashboards are directly available in the dashboard menu. By pinning a dashboard, you add it to the menu so you can easily open it.
Dashboard pins
- Go to Dashboards.
- Find the dashboard you want to add to the menu.
- Click on the pin function for the relevant dashboard.
- The dashboard is added to the dashboard menu.
Do you no longer want to show the dashboard in the menu? Then disable the pinning function again. The dashboard will remain and can be pinned again later.
Use multiple dashboards
You can create various dashboards for diverse tasks.
For example, you can put together a dashboard for:
- Collection Registration – With lists, object overviews, and recent changes.
- Media Management – With folders from the file manager, storage statistics, and information about media files.
- Application management – With user statistics, license usage, notifications, and data traffic.
- Publication and Linked Open Data – With publication status, SPARQL results, and statistics on publicly visible objects.
- Daily tasks – With shortcuts, notifications, open responses, and ongoing bulk actions.
By using multiple dashboards, you can organize information and functions clearly without everything having to be on a single page.
Change a dashboard
Do you want to change the name, content, or layout of an existing dashboard?
- Open the relevant dashboard.
- Activate edit mode.
- Adjust the desired settings.
- Optionally add new widgets or remove existing widgets.
- Save the changes.
The adjusted layout is then displayed when you reopen the dashboard.
Removing a dashboard
To remove a dashboard:
- Go to Dashboards.
- Select the dashboard you want to delete.
- Click on the delete function.
- Confirm the deletion action.
Sharing dashboards
You can easily share a dashboard with users of other KLEKSI environments or applications. This allows them to import your dashboard configuration and use it within their own environment.
Exporting a dashboard
- Go to the overview of all dashboards.
- Click on the three dots next to the name of the dashboard you want to share.
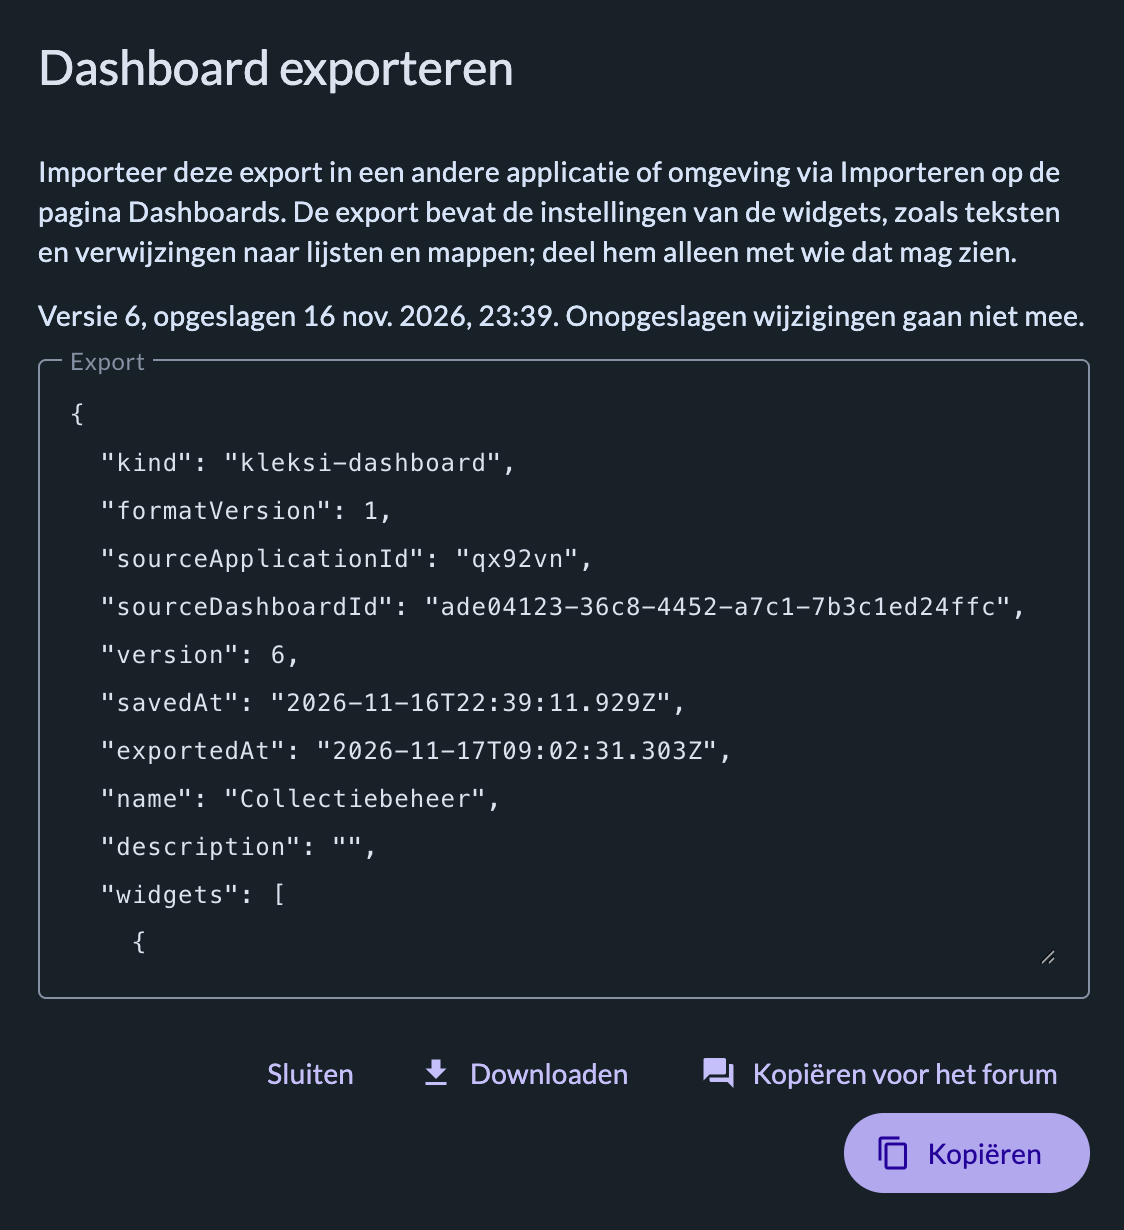
- Select Export. A window opens with two options (see screenshot below):
- Download: download the dashboard configuration as a file. You can then send this file to other users.
- Export to forum: generate a code to share the dashboard via the KLEKSI forum.
Sharing a dashboard via the KLEKSI forum
Do you want to make your dashboard available to other KLEKSI users? Then select Export for forum and post the generated code in a message on the KLEKSI forum.
The forum automatically recognizes this code and displays a button that allows other users to copy your dashboard configuration and then import it into their own environment.
In this way, you can inspire other users with your dashboard layout and benefit yourself from dashboards that others have put together.
Importing a dashboard
Have you received a dashboard configuration from another user or found it via the forum? Then you can easily add it to your own environment.
- Go to the overview of all dashboards.
- Click Import in the top right.
- Import the received file or paste the configuration code that you copied from the forum.
After importing, you can customize and use the dashboard as you wish.
Sharing dashboards within your own environment
Please note: Exporting or importing is not necessary to share dashboards within your own KLEKSI environment.
Other users within the same environment can view the available dashboards directly and, if desired, add them to their own dashboard menu by pinning them.
The export and import function is intended exclusively to exchange dashboard configurations between different KLEKSI environments or applications.
Permissions dashboard
The information a user can view on a dashboard depends on the rights assigned to the relevant user role.
As a result, a dashboard may be fully or partially visible. Widgets that display information to which a user does not have access rights are not displayed or show only the data for which the user is authorized.
This also applies to statistics. These are only visible to users who have been granted the appropriate rights via the role settings.
This way, you can make dashboards available to multiple users, while access to information and functionalities is automatically tailored to their rights.
Important
Deleting a dashboard does not affect the underlying data in KLEKSI. Objects, collections, lists, media files, and other data are retained.
Even when you remove a widget, only the widget and the associated dashboard settings are removed. The data displayed by the widget remains available in the application.
With KLEKSI's configurable dashboards, you fully tailor your work environment to the information and functions that are important to you.
- © Copyright KLEKSI - KLEKSI is a product of Sofco
- Privacy policy
- Cookies
- Developed by Sofco